
Learn about AI for accountingJoin live workshops

Ask the support agent

Just ask a direct question or search related articles from the Knowledge Base.

Support Center / Workpaper Agent / Journal Entries

Prepare, review, and post journal entries to QuickBooks Online

Prepare journal entries from your workpaper, review mappings and balances, and post to QuickBooks Online. Follow Steps 1–5 for the main workflow; Steps 6–10 cover optional fixes, and Steps 11–12 are recommended checks.

Workflow

Step 1

Prepare your journal entries

Open Workpaper Agent → Workpapers and choose your workpaper. Studio opens with the spreadsheet and Agent chat. Confirm the workpaper belongs to the intended QuickBooks company, and check the source entries and dates.

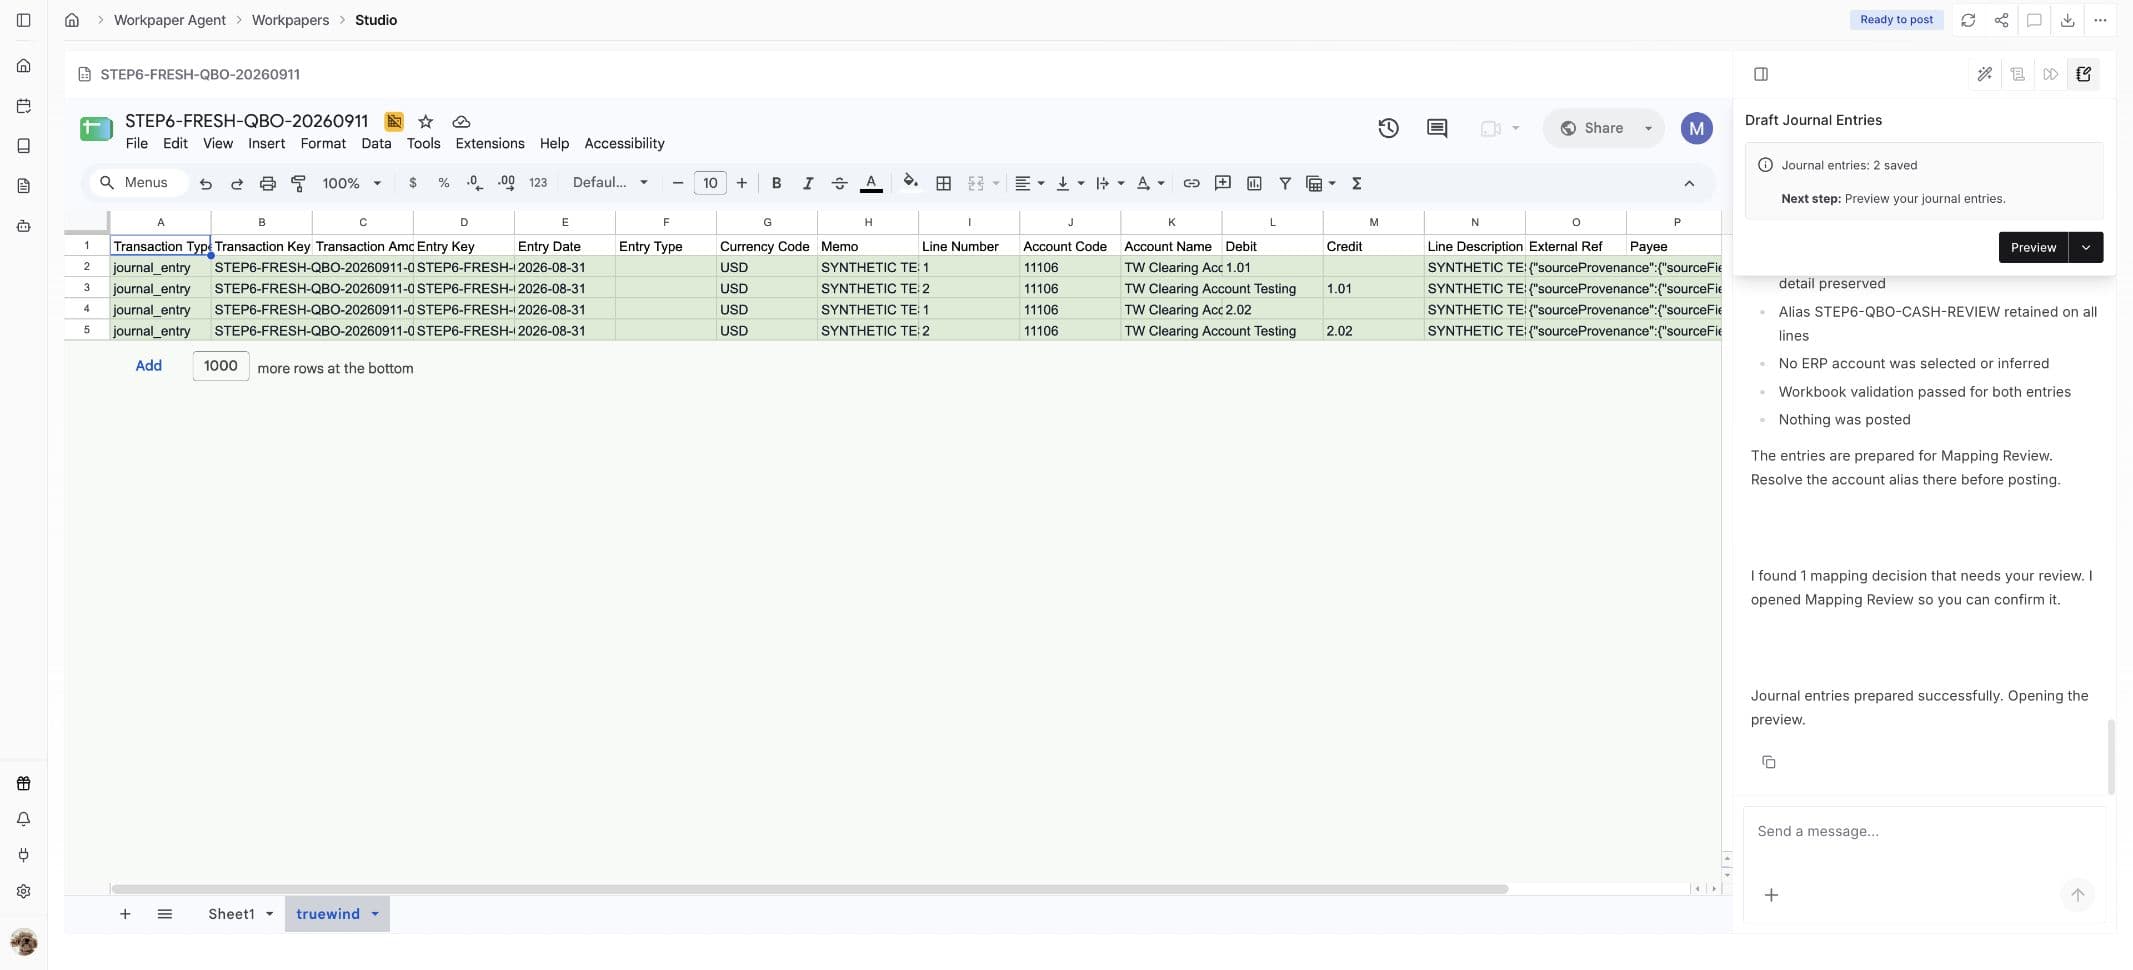
Click Draft Journal Entries above chat, then Prepare in the panel. Wait for the draft rows to be created.

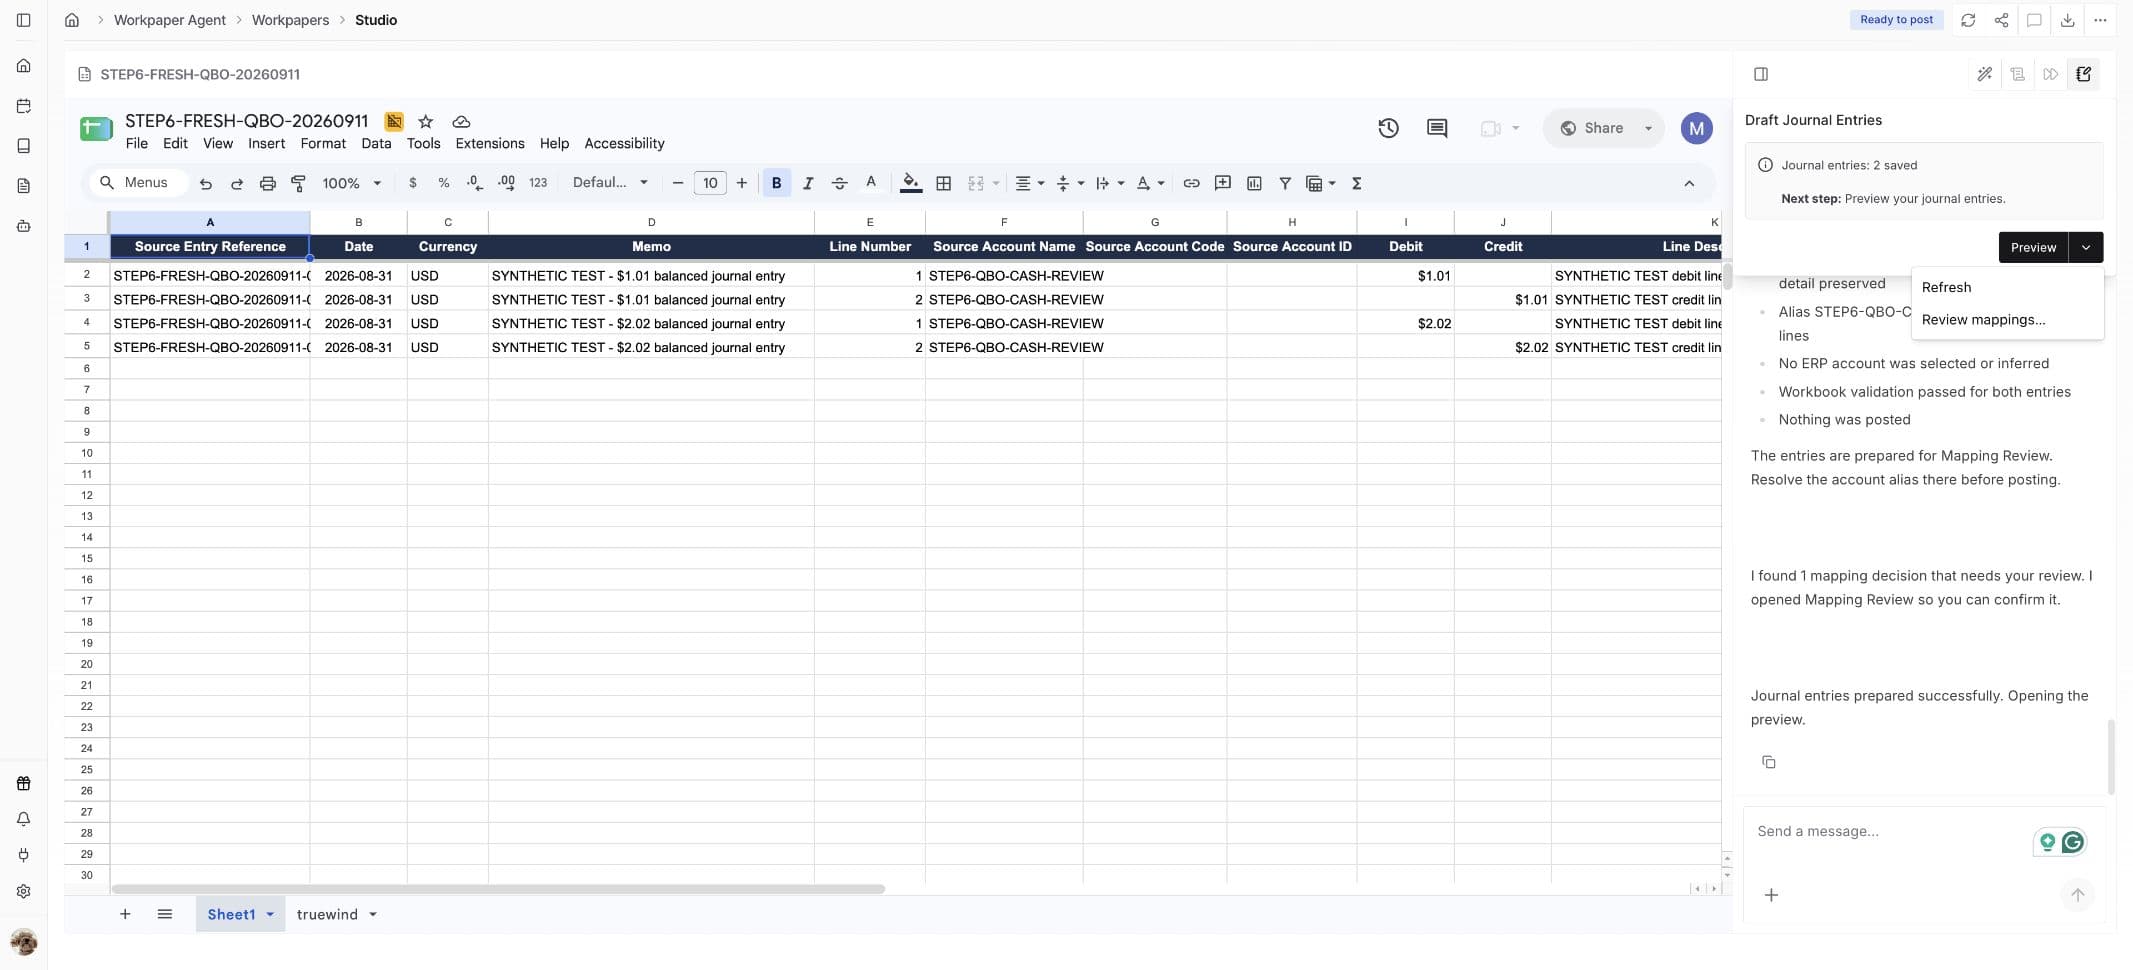
Continue to Step 2 for mappings, or Step 7 for an error. If drafts already exist, follow the panel’s Next step message. The screenshot shows an existing draft, so its button says Preview instead of Prepare.

QuickBooks Online workflow: Prepare your journal entries

Step 2

Review account, payee, and dimension mappings

If Review mappings appears, open it and match the workbook labels to QuickBooks records.

Account: choose the active GL account. Check its full name or code.

Payee: choose the supported vendor or customer when required.

Dimensions: check Class and Location where offered. Complete required fields; skip a dimension only if the dialog allows it and your entry does not need it.

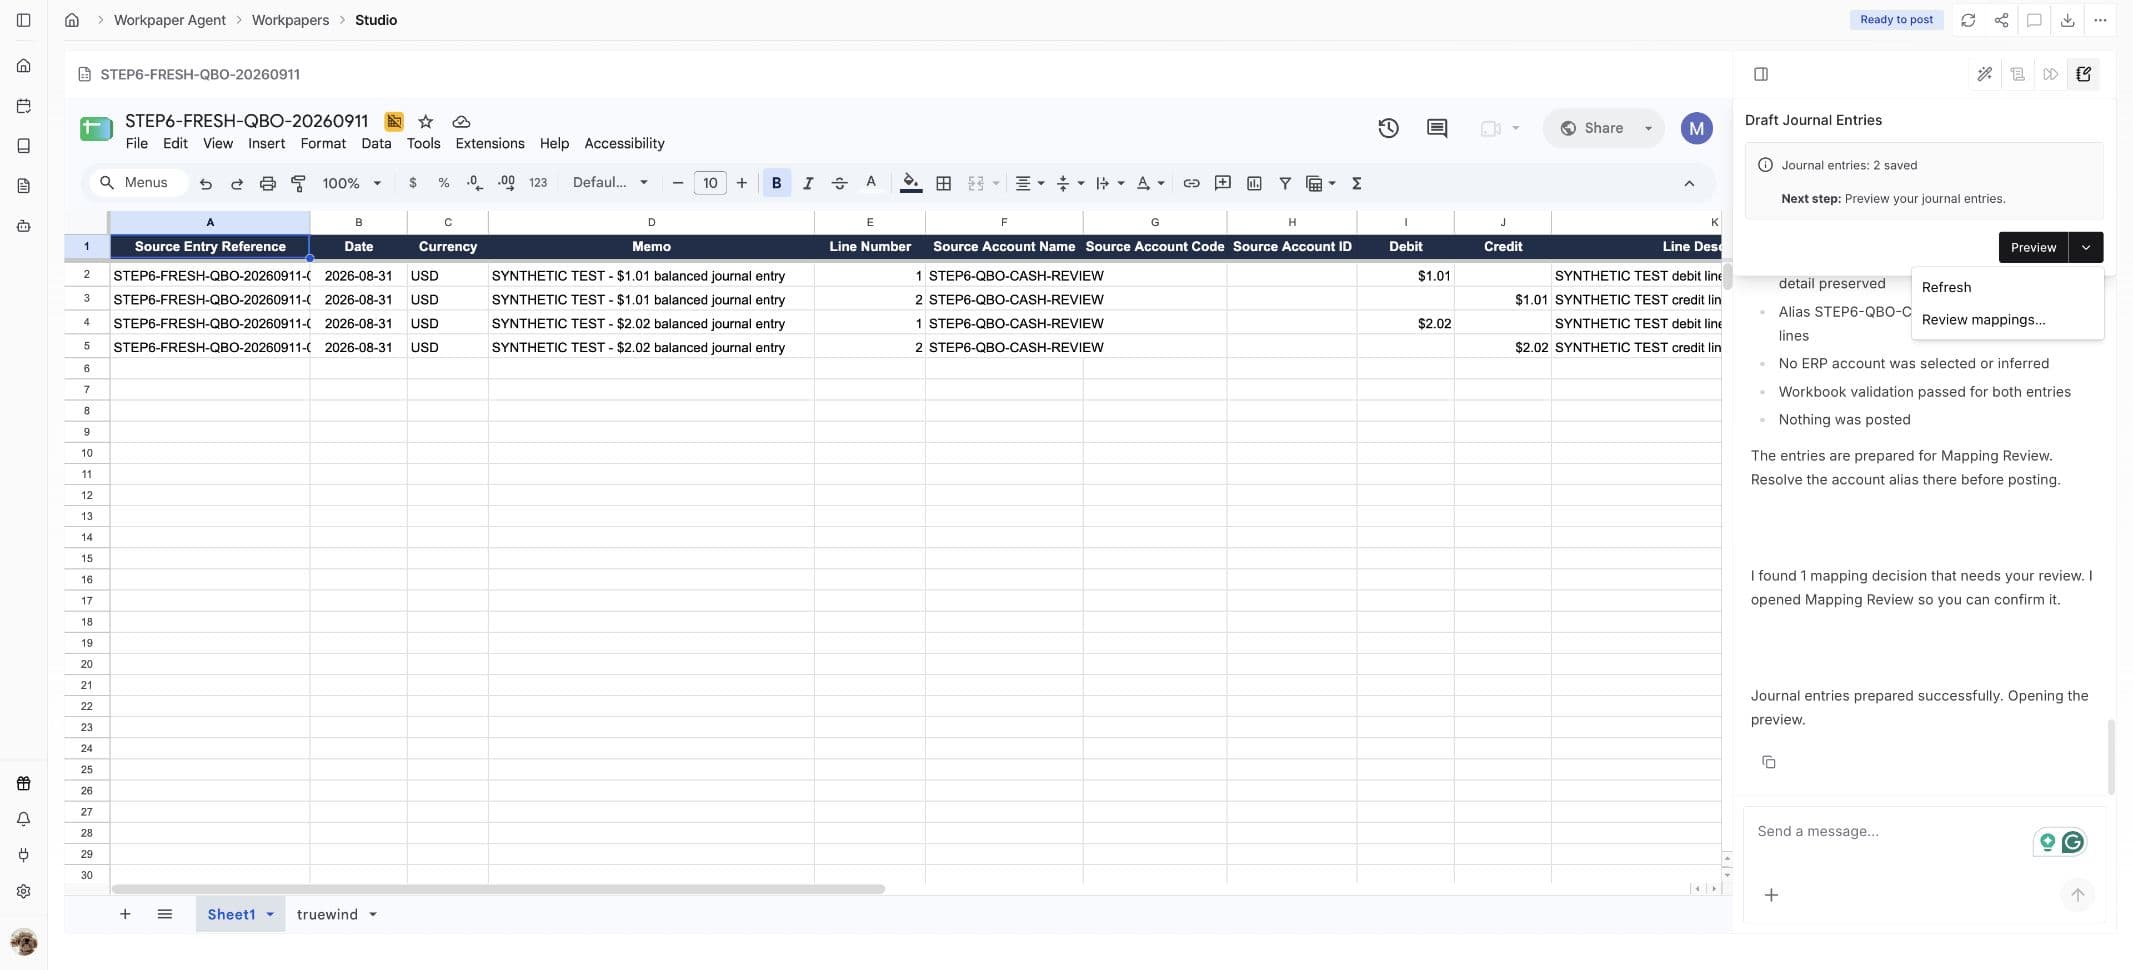
Accounts must be resolved. If no mapping review is requested, check the saved values in Preview. The screenshot shows where to reopen Review mappings.

QuickBooks Online workflow: Review account, payee, and dimension mappings

Step 3

Check the Preview

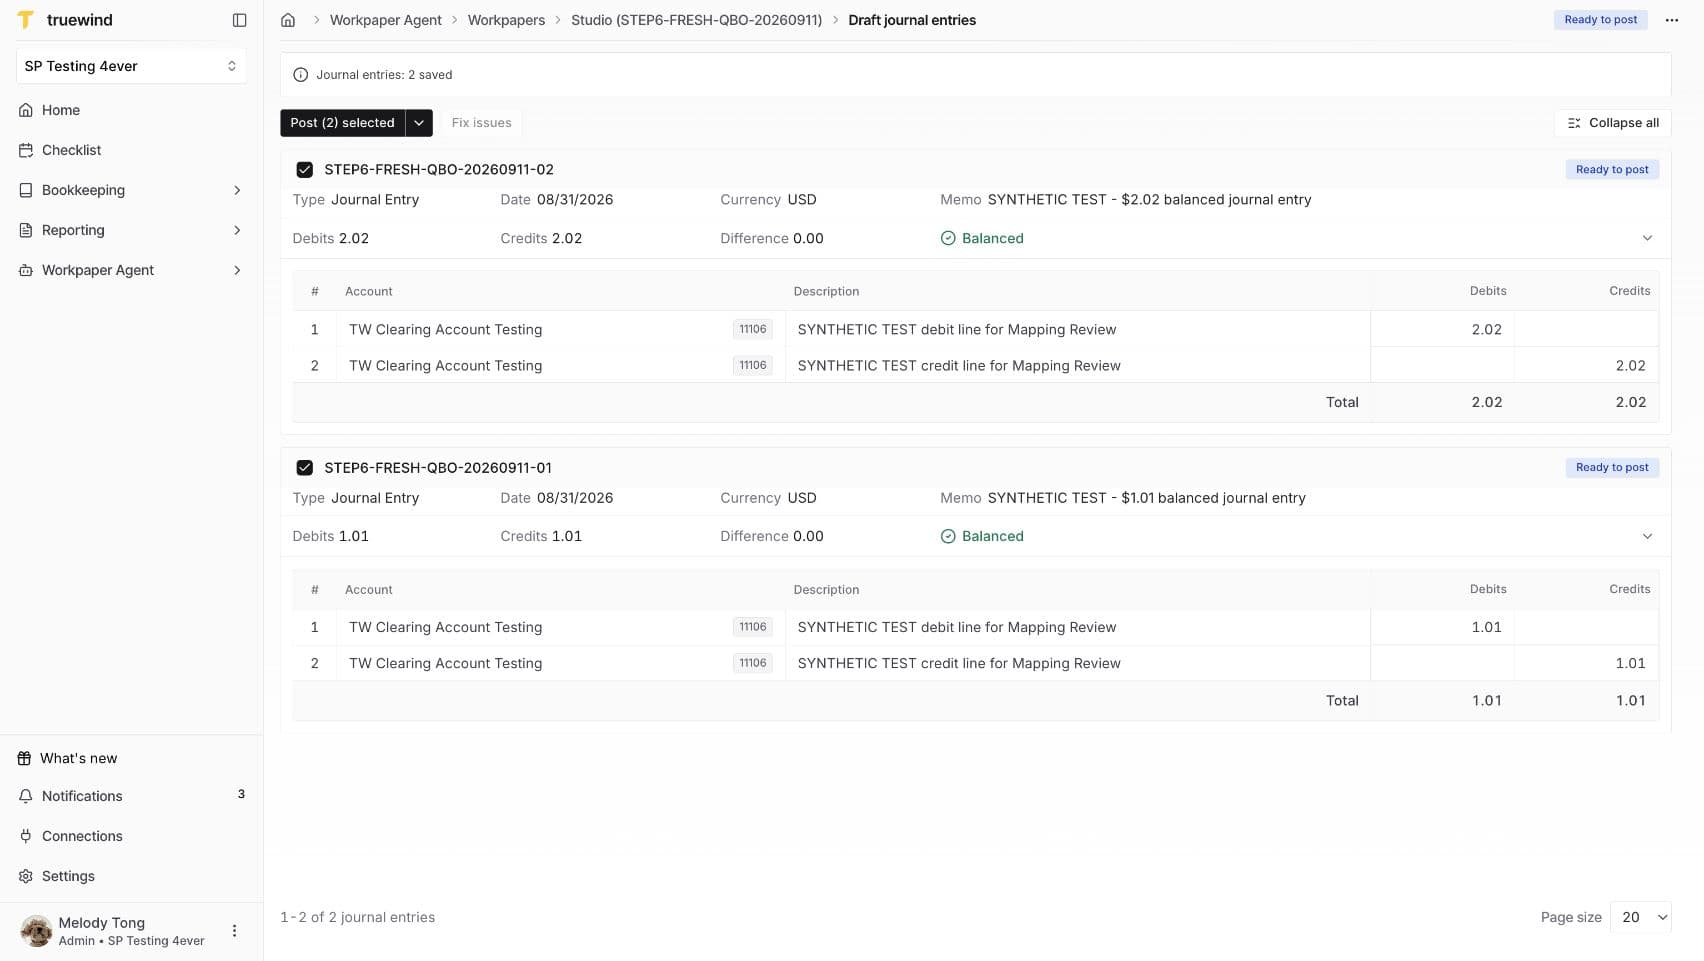
Open Preview in the Draft Journal Entries panel. Compare each entry with your source. Check the date and accounting period, memo, line descriptions, accounts, payees, and dimensions.

Check the debit and credit amounts on each line—not just the totals. Confirm Difference is zero and the entry is Balanced. “Ready” means product checks passed; complete your accounting review and any required sign-off.

For a draft value, use Step 6. For an error, use Step 7. For a source change, use Step 8; for a mapping, Step 9. Return here and review the updated Preview before posting.

QuickBooks Online workflow: Check the Preview

Step 4

Post the reviewed entries

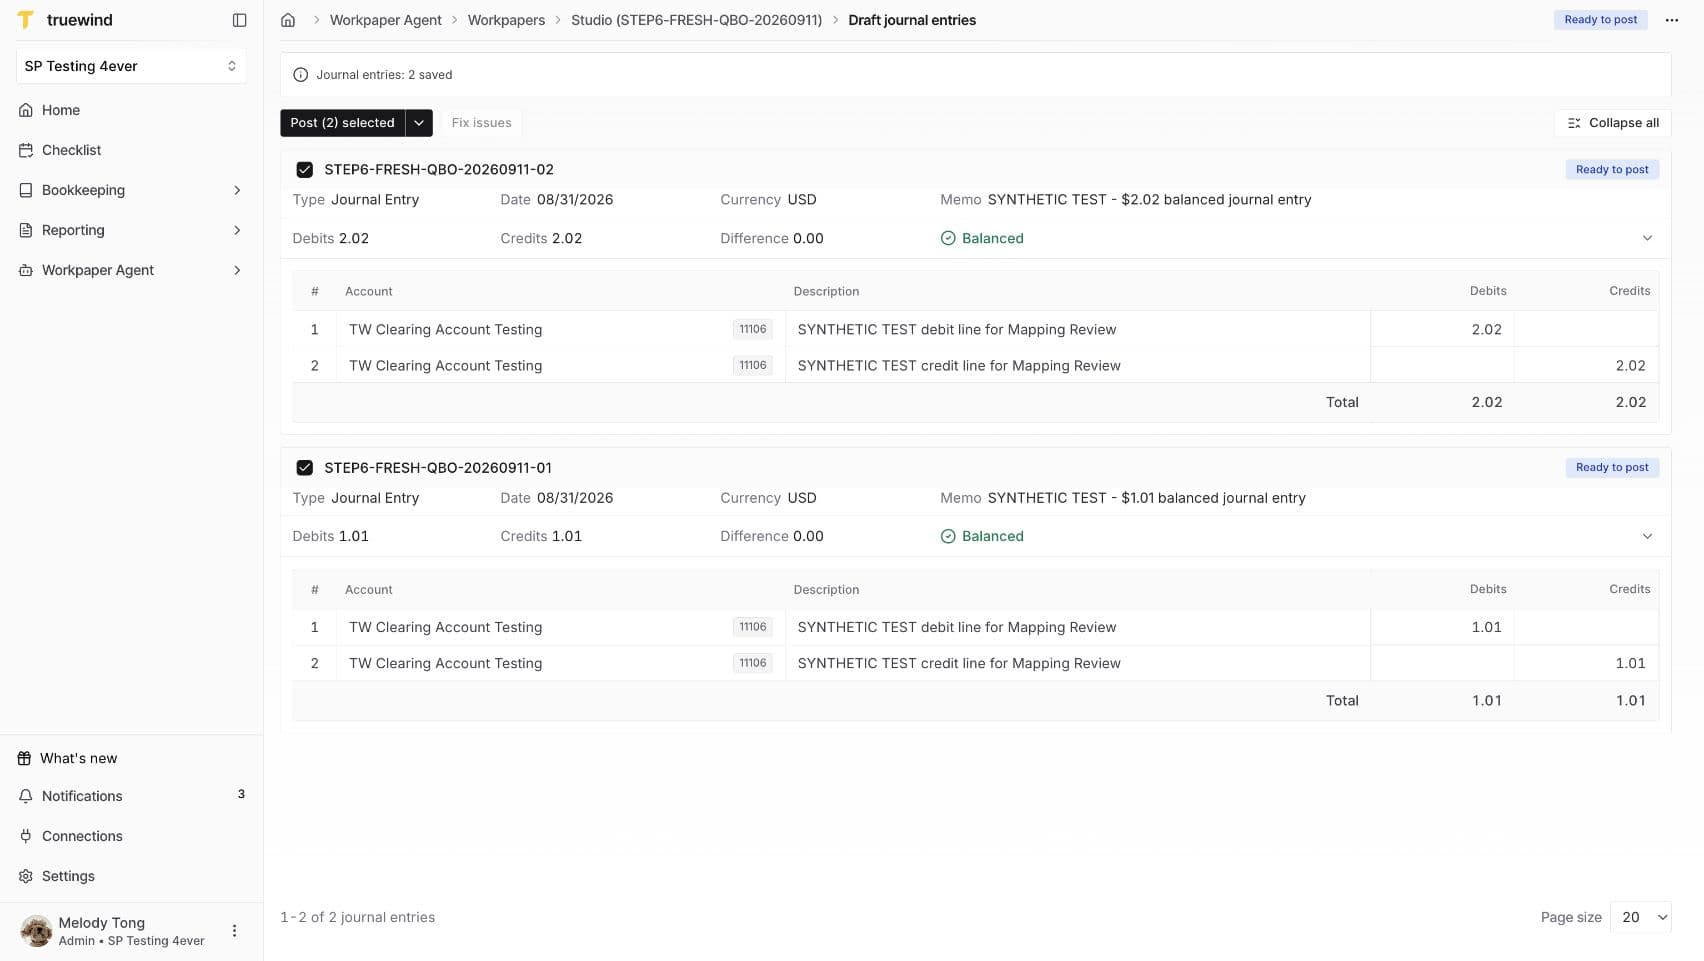
Select the entries you reviewed, then click the Post button in Preview (for example, Post (2) selected). This opens the posting confirmation dialog; nothing is submitted yet.

In the confirmation dialog, review the attachments that will be sent to QuickBooks Online. Return to Preview if the selected entries need to change.

Click the dialog’s final Post button once to submit. Then wait for the result; Posting means the request is still running.

If the result is unclear, check Journal Entries and your accounting system for the same reference, date, amount, and memo before retrying.

The screenshot shows the Preview button that opens the dialog, before final confirmation.

QuickBooks Online workflow: Post the reviewed entries

Step 5

Confirm the posting result

Confirm each selected entry shows Posted and keep its reference. If only some entries failed, investigate those entries. Do not repost the successful ones.

The main workflow is complete. Use Steps 6–10 for changes or problems, and Steps 11–12 to check the saved records.

QuickBooks Online workflow: Confirm the posting result

Step 6

Optional — Edit the draft, then Refresh

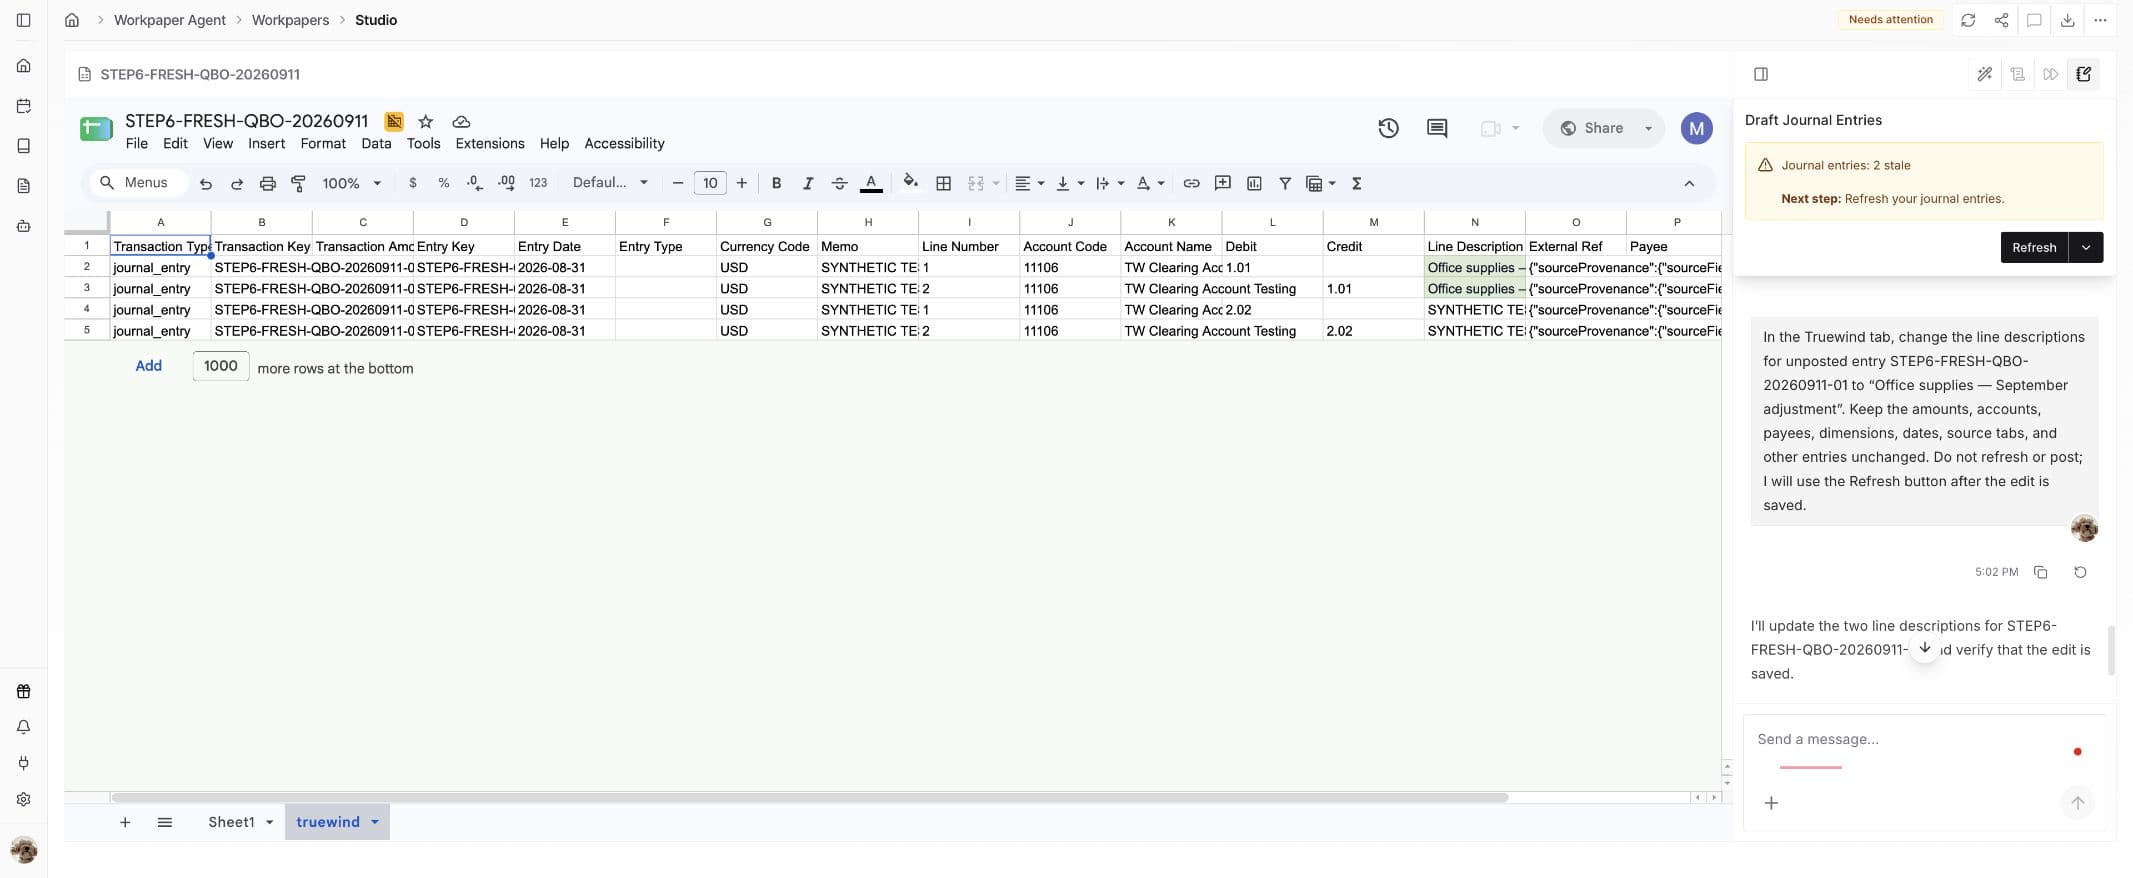
Return to Studio and edit the existing value in the Truewind tab, or ask the Agent. Keep the columns and layout intact.

Example: “In the Truewind tab, change the description for [entry reference, line number] to ‘Office supplies — September adjustment’. Keep amounts, accounts, and dimensions unchanged.” Replace the bracketed text with the entry you want to edit.

Wait for saving, then open Draft Journal Entries → Refresh. Confirm the change appears in Preview and that the other fields remain correct.

QuickBooks Online workflow: Edit the draft, then Refresh

Step 7

Optional — Resolve an error

Open View errors and find the named field or row. Correct it, or use Fix issues if available. Check the Agent’s proposed changes to amounts, accounts, and dimensions before confirming.

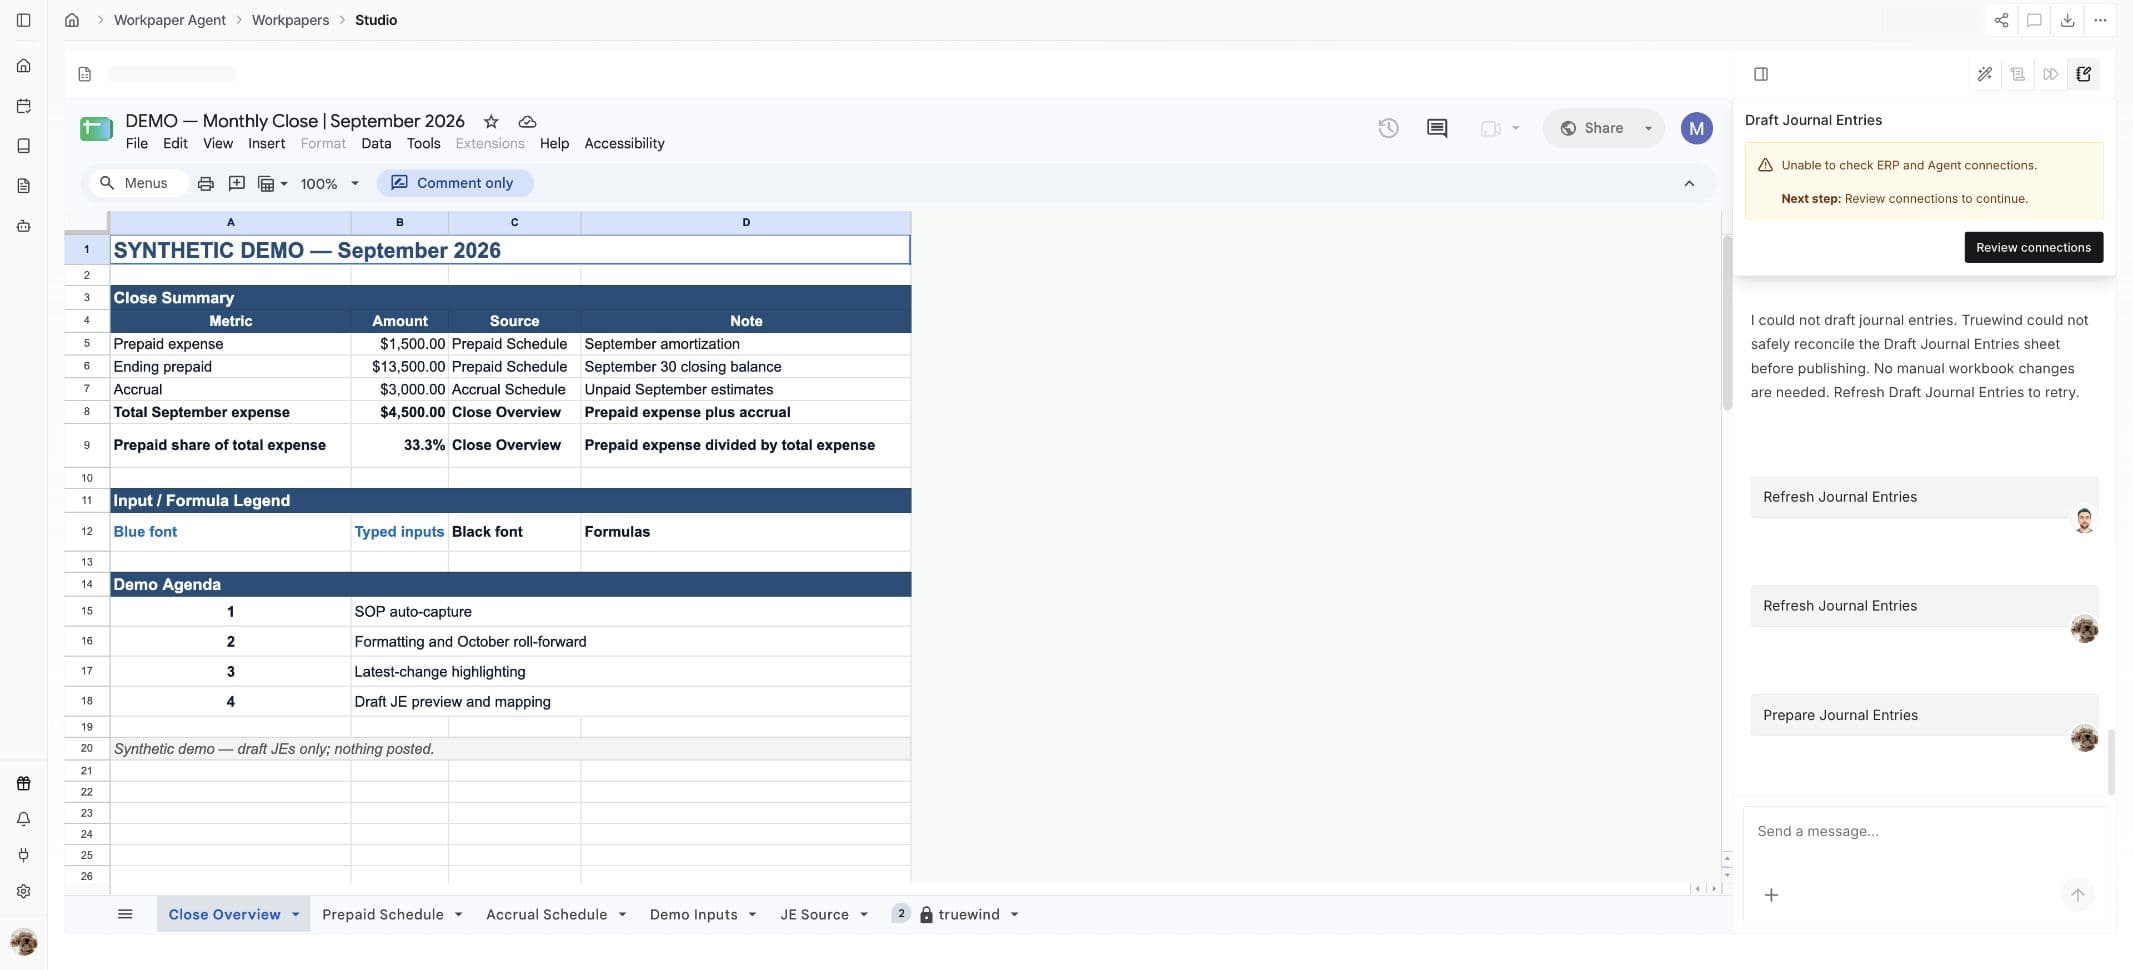
After saving, follow the panel’s main action: Prepare for a first draft, Refresh for an existing draft, or Rebuild from source when required. Return to Preview and confirm the error is cleared.

QuickBooks Online workflow: Resolve an error

Step 8

Optional — Update source or ERP information

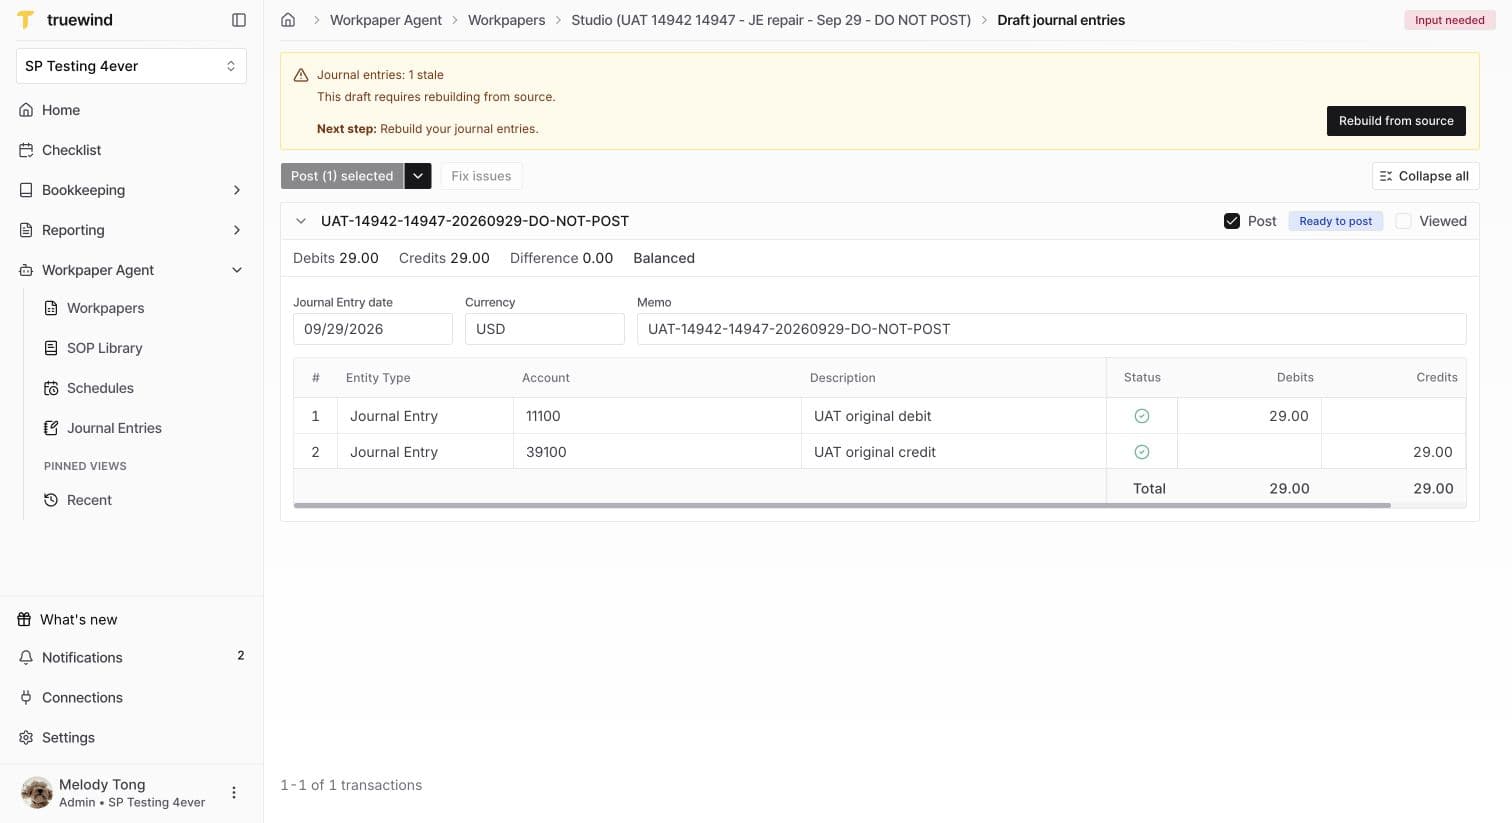
Edit the source tab or ask the Agent, then wait for saving. Open Draft Journal Entries and follow its Next step message: Refresh, or Rebuild from source when required.

Before rebuilding, copy any direct Truewind-tab edits you want to keep into the source. Rebuild can replace those draft edits.

For new or renamed accounting records, use Sync with Ledger at the top right of Studio where available, then review the mappings and Preview.

QuickBooks Online workflow: Update source or ERP information

Step 9

Optional — Change an existing mapping

In Studio, open Draft Journal Entries → the arrow beside its main button → Review mappings.

Choose the replacement account, payee, or dimension and confirm. In Preview, check that the intended lines use the new mapping. This reviews the current draft; saved organization mappings can also affect future drafts.

QuickBooks Online workflow: Change an existing mapping

Step 10

Optional — Correct a posted entry

Open the posted entry from Workpaper Agent → Journal Entries and choose Unpost.

After unposting finishes, correct the draft, Refresh, review, and post again. If Unpost is unavailable, follow your firm’s correction process. Unposting and creating a reversing entry are different actions.

QuickBooks Online workflow: Correct a posted entry

Step 11

Recommended check — Open the saved JE in Truewind

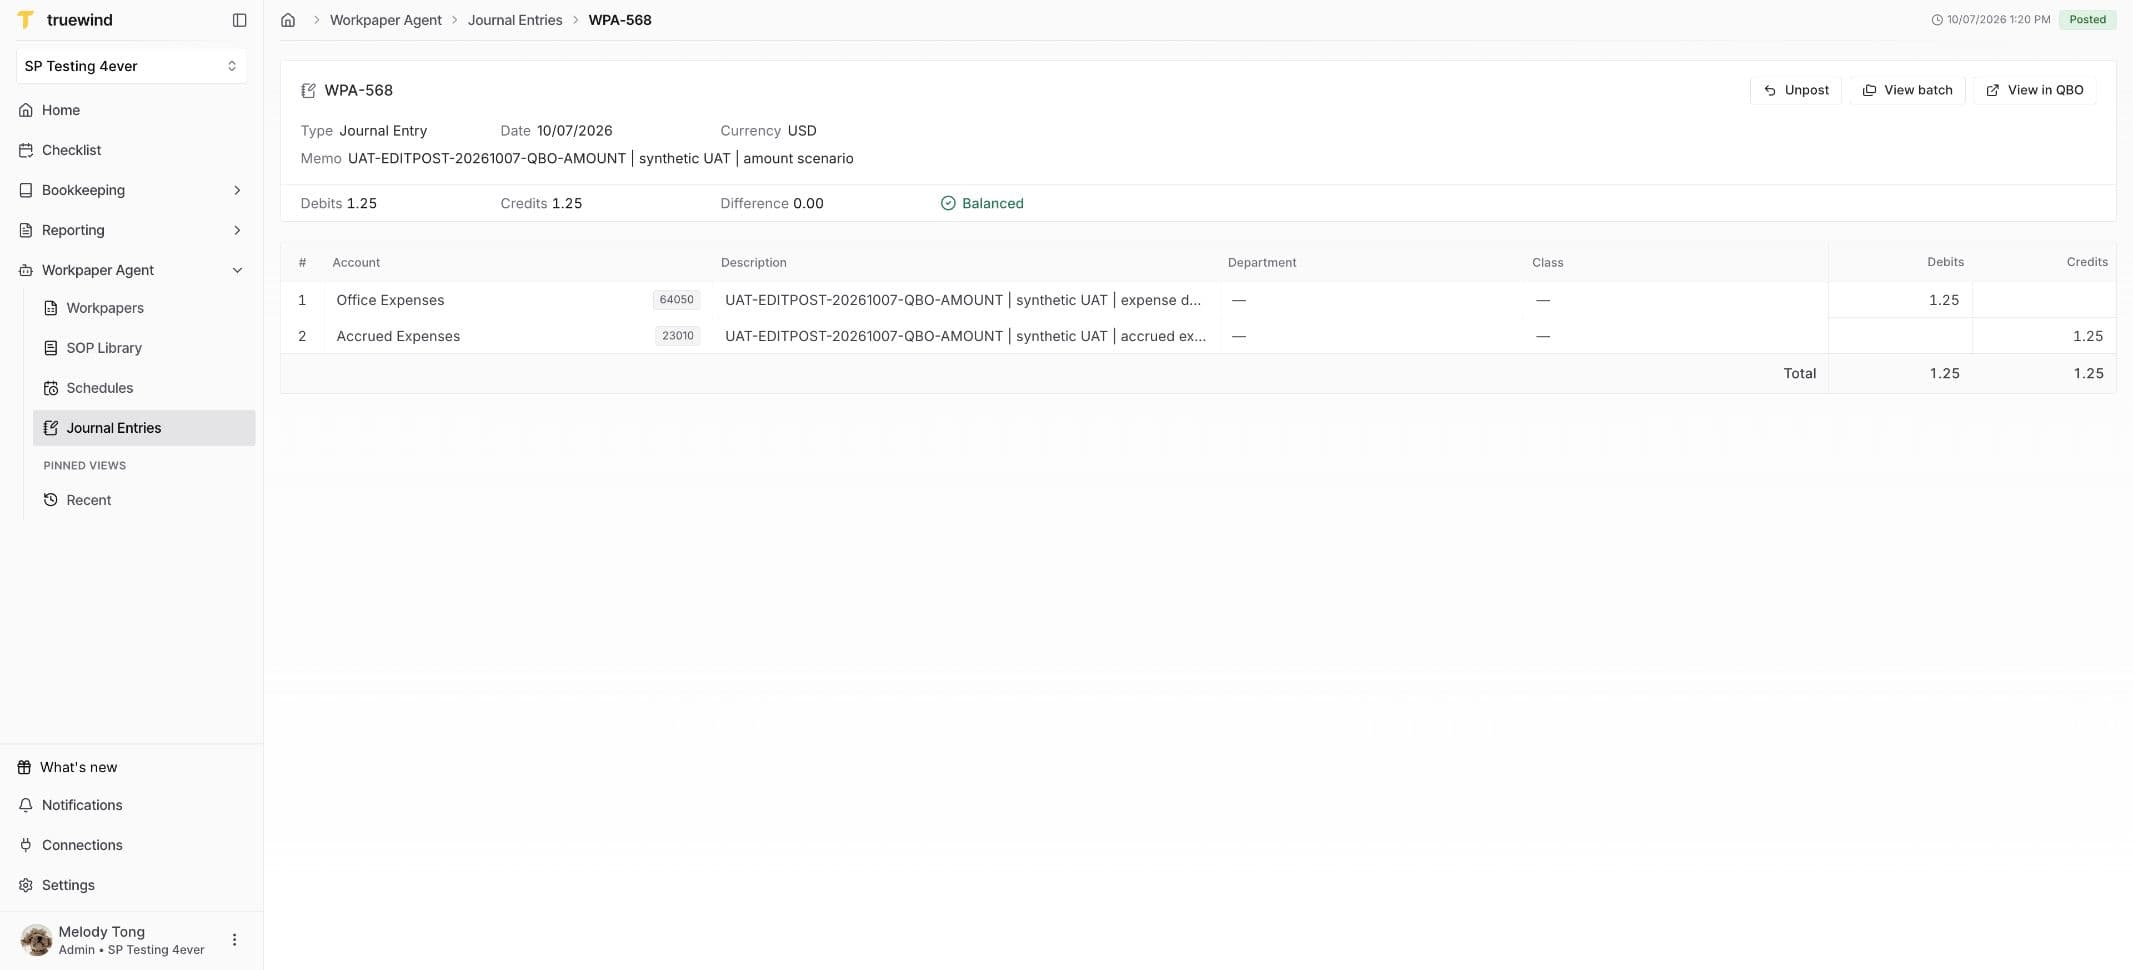
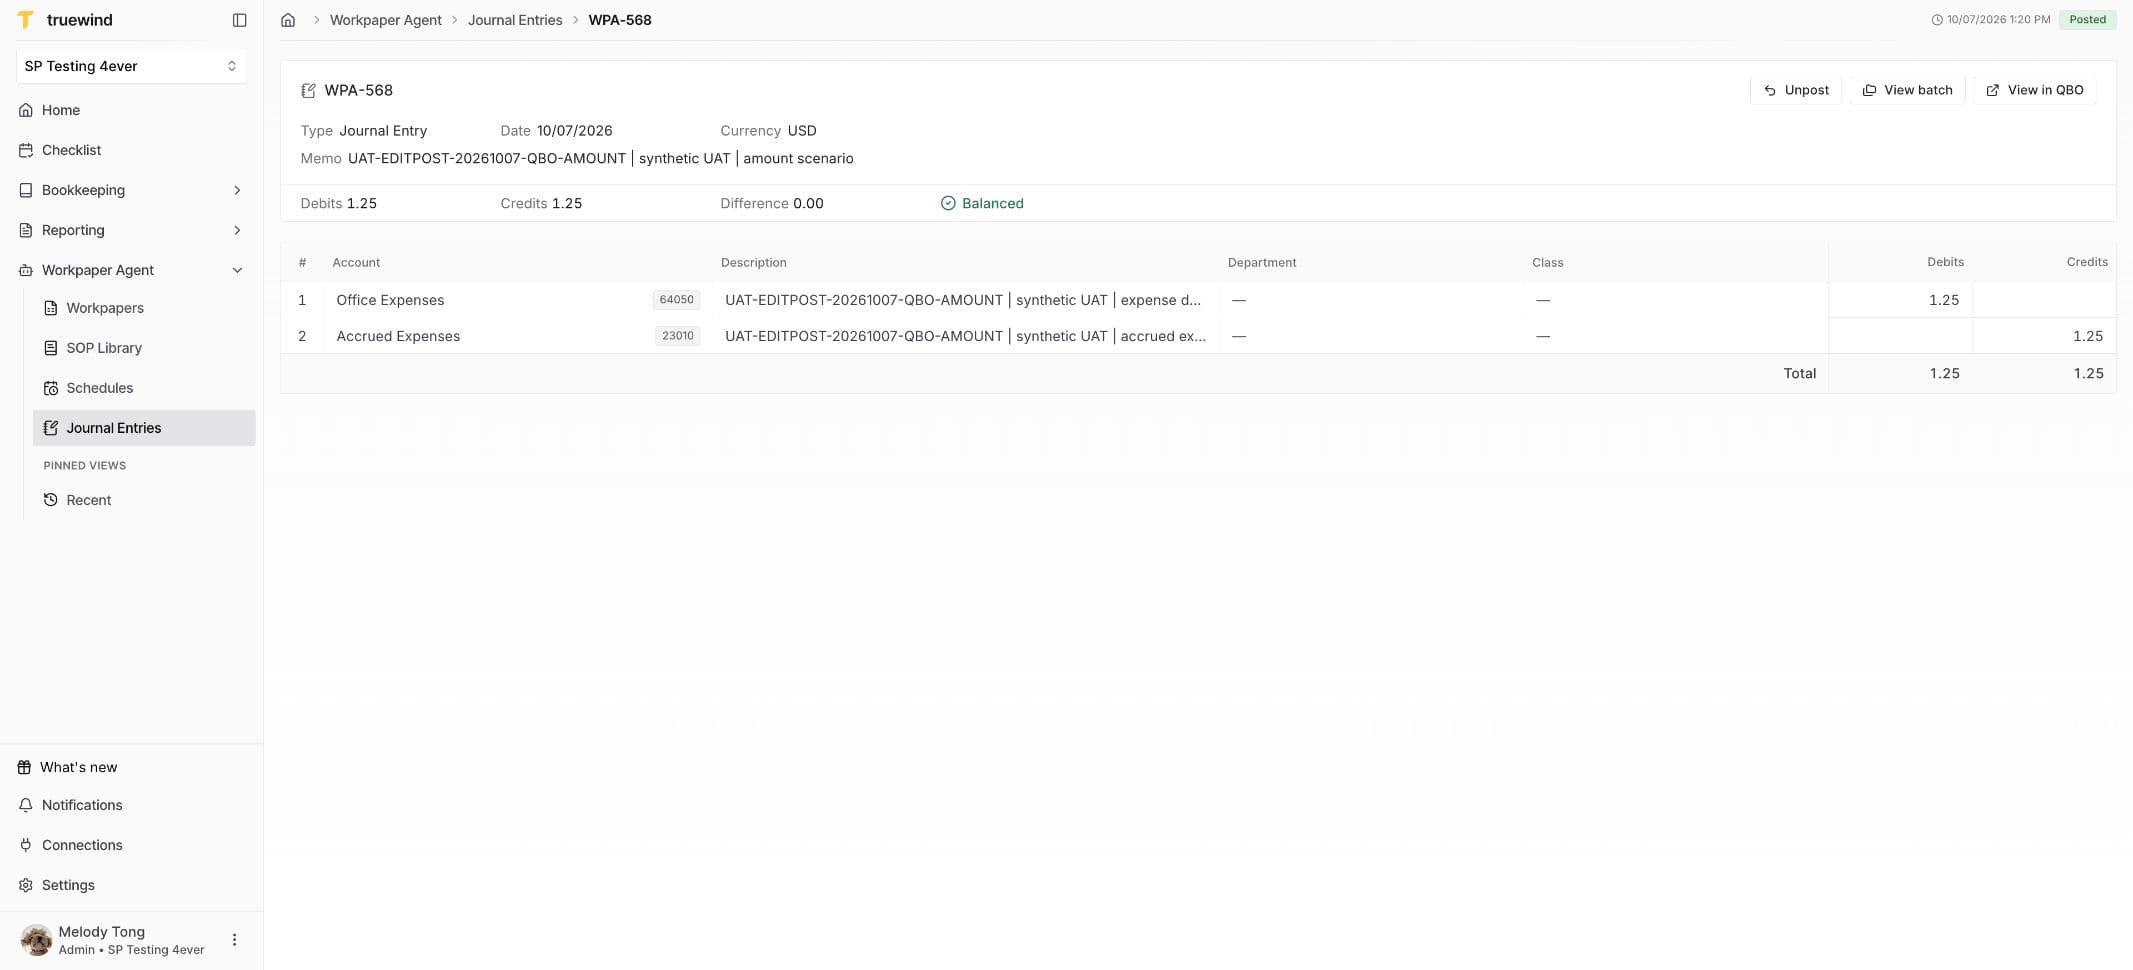
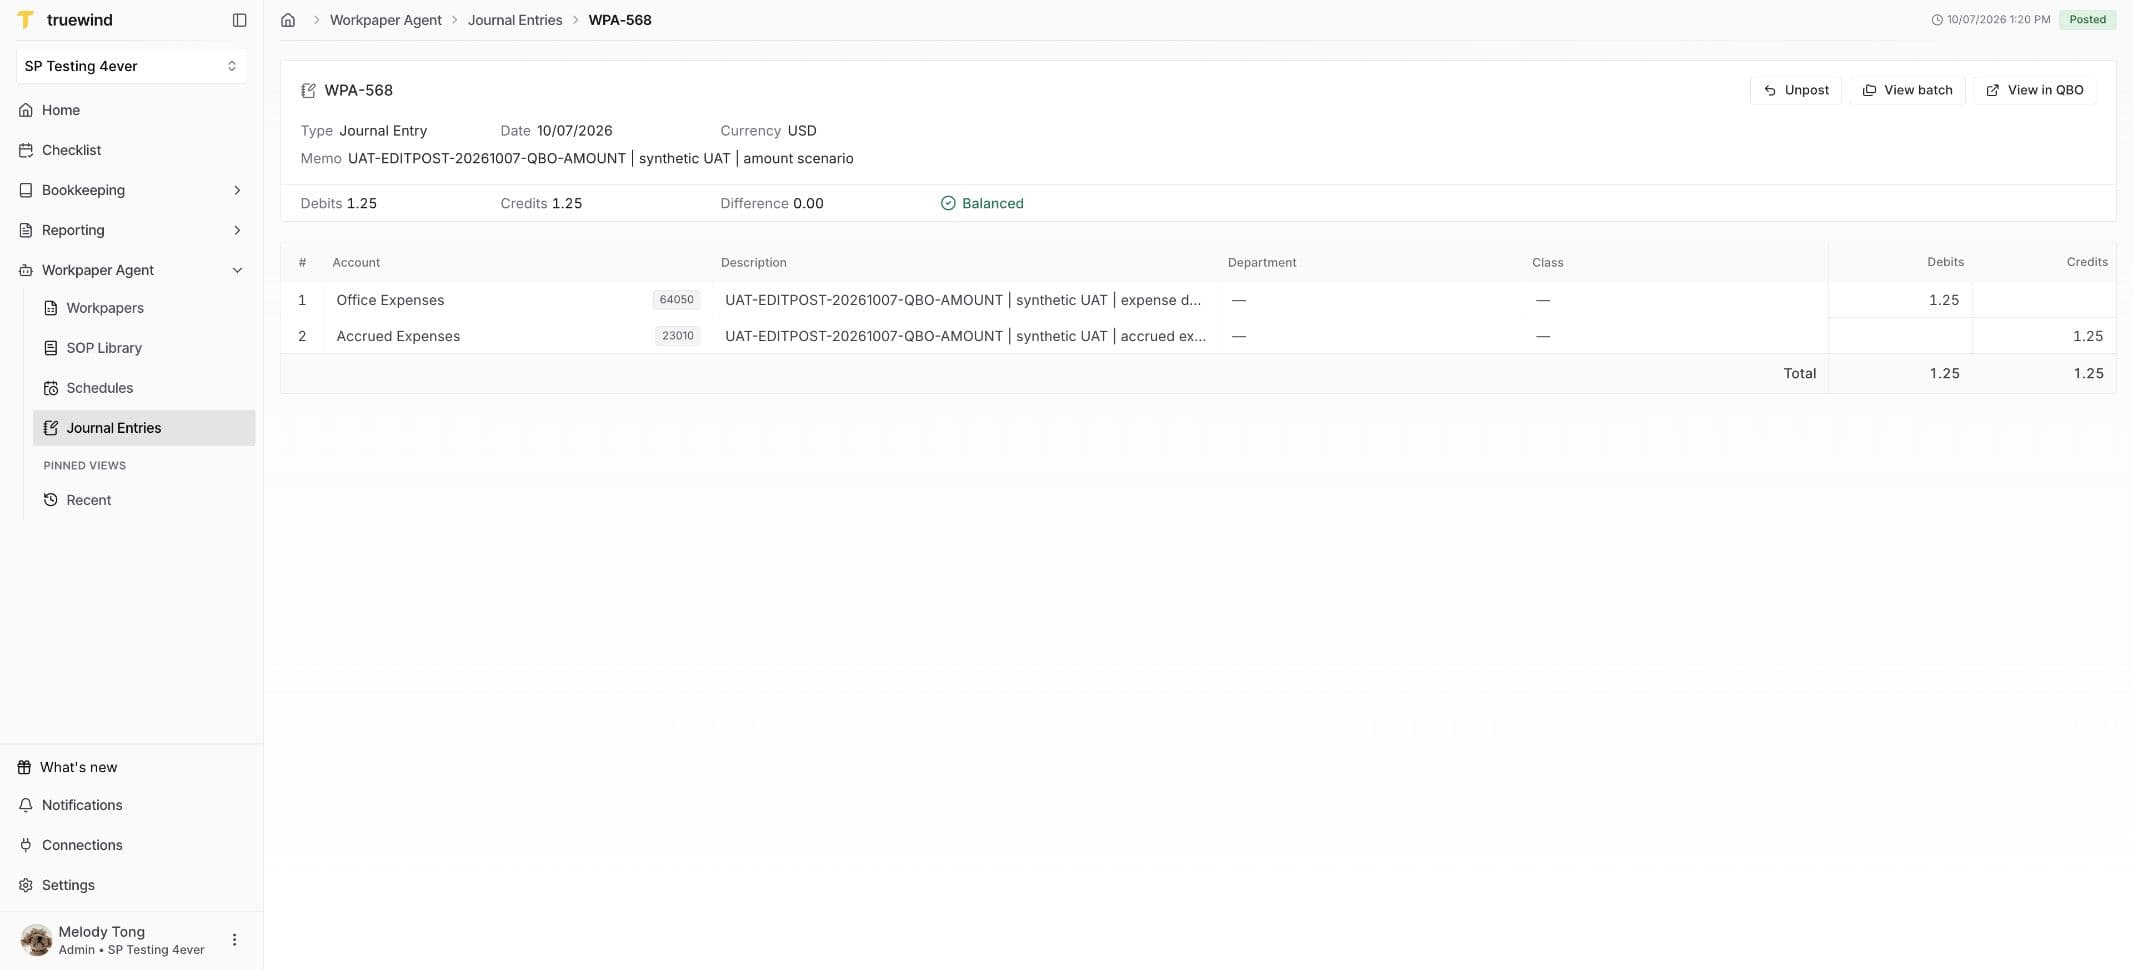
Open Workpaper Agent → Journal Entries, find the posted entry, and open its saved detail. Compare the date, memo, amounts, accounts, payees, and dimensions with your final Preview, and keep the reference for the ERP check.

QuickBooks Online workflow: Open the saved JE in Truewind

Step 12

Recommended check — Find the JE in QuickBooks Online

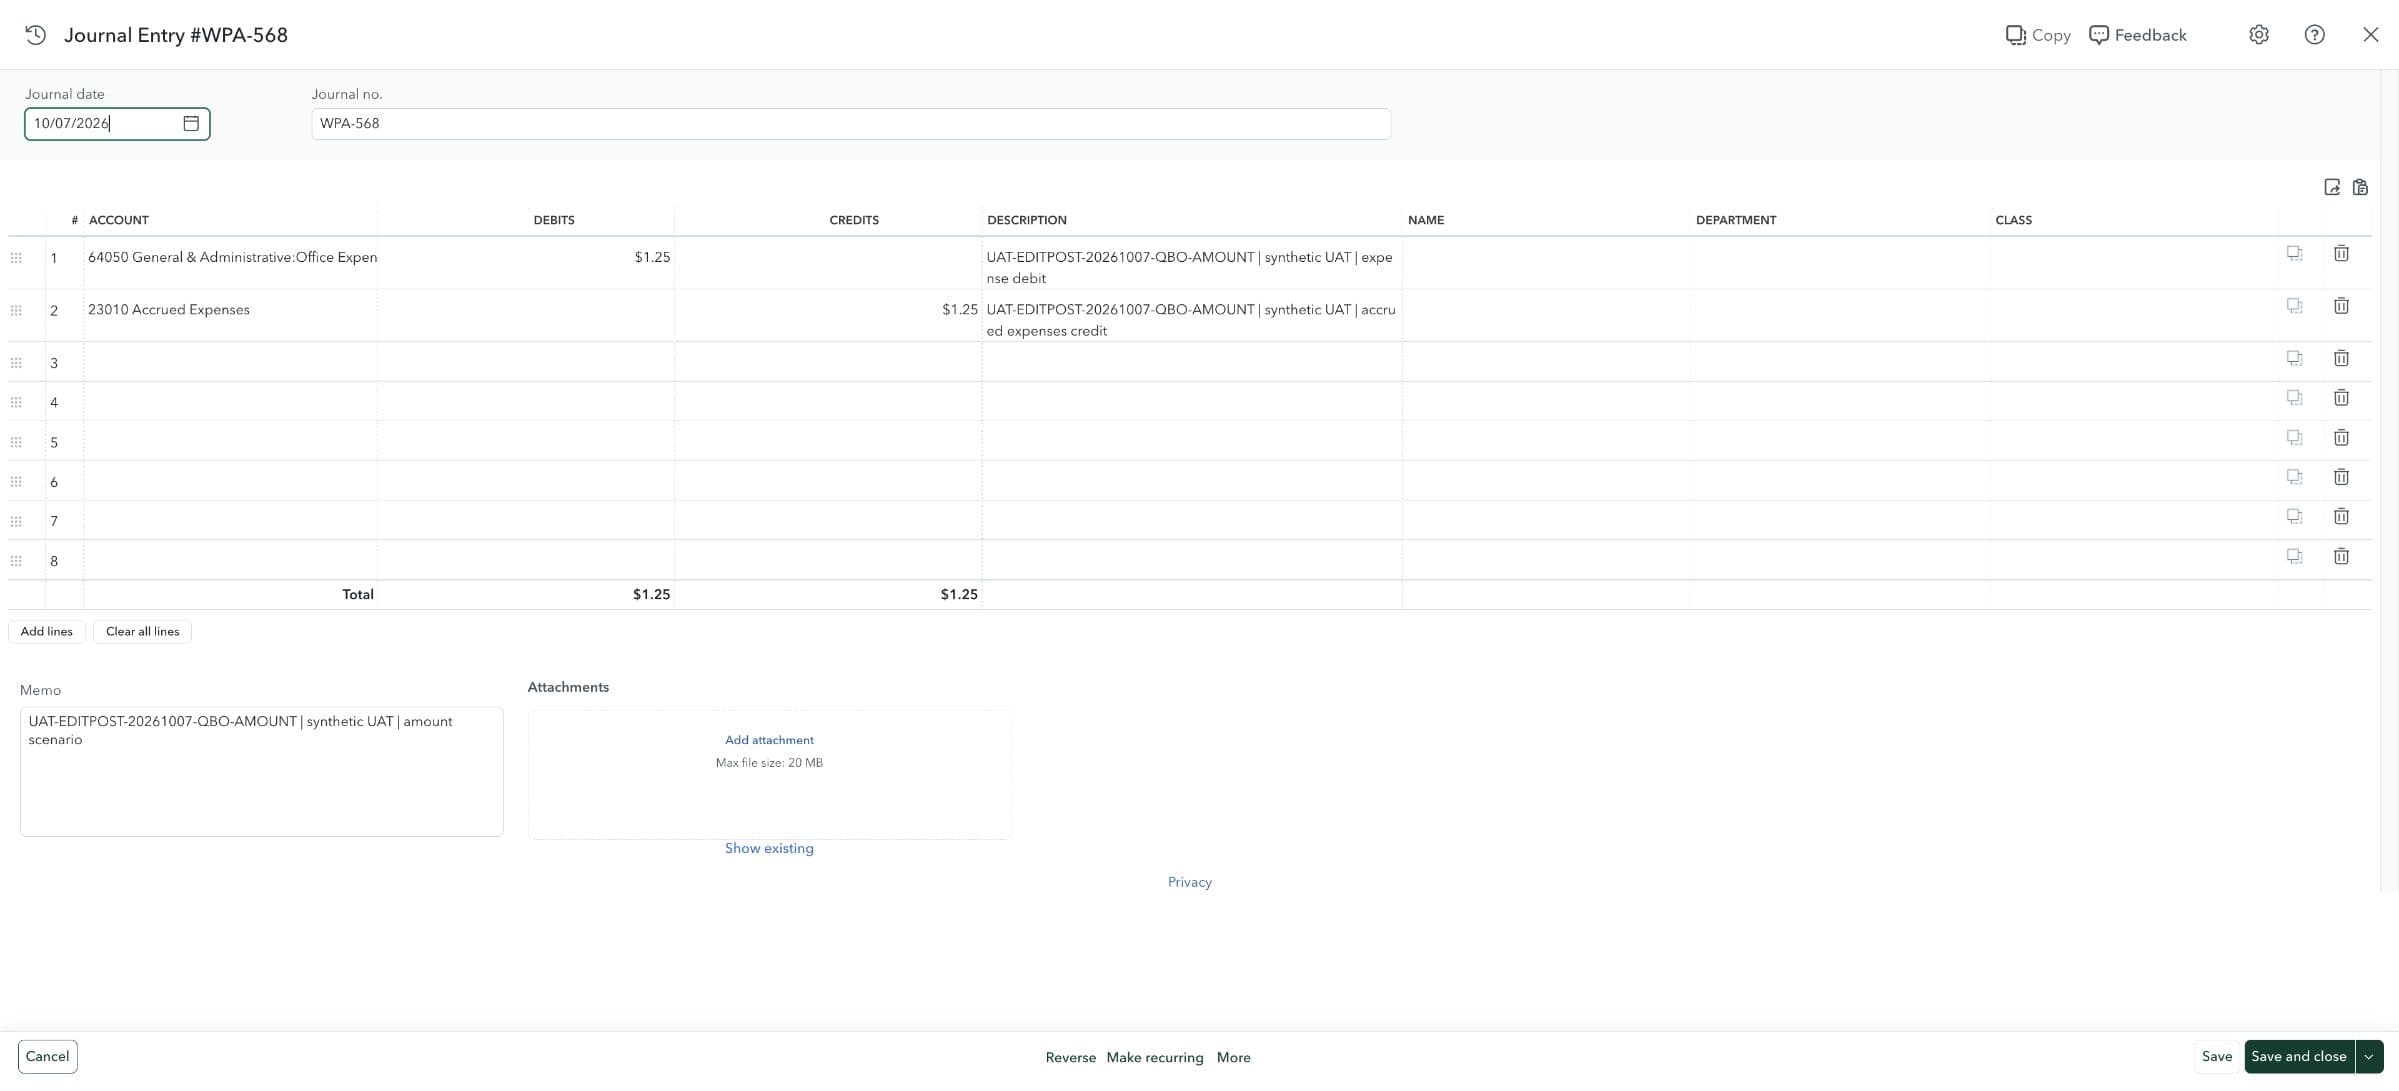
Click View in QBO from the saved Truewind entry, or find it in the correct QuickBooks company using its reference, date, amount, and memo.

Open the matching record and compare the accounting details. Confirm there is one posting and keep the QBO reference with your review notes.

QuickBooks Online workflow: Find the JE in QuickBooks Online

Start with source journal entries already in your workpaper. Steps 1–5 cover the main workflow. Use Steps 6–10 only when you need a correction, then check the saved records with Steps 11–12.

Find your way

  • Studio: the workpaper screen with your spreadsheet and Agent chat.
  • Truewind tab: the prepared journal-entry rows in the spreadsheet.
  • Draft Journal Entries: the button above chat that opens the action panel.
  • Preview: the screen where you review and post drafts.
  • Sync with Ledger: the circular-arrow button at the top right of Studio, where available.
  • Journal Entries: the saved entry list under Workpaper Agent in the left sidebar.

Which button do I click?

  • Prepare: create the first draft from your source.
  • Refresh: update an existing draft after saving edits. Follow “Next step: Refresh your journal entries.”
  • Rebuild from source: use this when the panel says the draft requires rebuilding or the Truewind tab is missing.
  • Preview: open the current drafts to review them.

Follow the panel’s Next step message. A new or renamed record in your accounting system alone does not mean you need to rebuild. Use Sync with Ledger where available, then review the mappings.

To change the current draft’s mappings, use its Review mappings action. Organization-level saved mappings can apply to future drafts.

FAQ

Should I use Prepare, Refresh, or Rebuild from source?

Use Prepare for the first draft. After an edit, follow the panel’s Next step message: Refresh uses saved changes; Rebuild from source recreates unposted drafts when the panel requires it. Preview opens drafts that are ready to review.

Do I always need to review mappings?

Complete Review mappings when Truewind requests it. If it does not appear, still check the accounts, parties, and dimensions in Preview. Use the arrow beside the panel’s main button to reopen Review mappings when available.

Can I edit the prepared Truewind tab?

Yes, edit existing values when the sheet allows it, or ask the Agent. Keep the columns and layout intact. Wait for changes to save, then Refresh and check Preview again.

What if only some entries post, or the result is unclear?

Check each entry’s result and look for its reference, date, amount, and memo in Truewind and your accounting system. Investigate failed entries separately. Avoid resending an entry that already exists.

Will changing a mapping update future drafts too?

Use the current draft’s Review mappings action to correct that draft, then verify Preview. Organization-level saved mappings can apply to future drafts. Do not assume a change to one draft updates every existing entry.

Where can I get help?

Open your profile menu at the bottom left and select Support. Include the workpaper URL and the error message so the team can locate the problem.

Limitations

Required mappings must be complete

Accounts cannot remain unresolved. Available payees and dimensions depend on your company and entry type. Complete every required field; skip only dimensions with an explicit skip option.

Rebuild can replace draft edits

Rebuild recreates unposted drafts from source. Copy any direct Truewind-tab edits you want to keep into the source first. If both the source and draft changed, reconcile them before refreshing.

Some cells and actions may be unavailable

If a cell is locked or the sheet is Comment only, ask the Agent to edit it. If Unpost is unavailable, use your firm’s correction process.

Balanced does not mean approved

A balanced entry and a Ready status do not replace accounting review or required sign-off.

Was this helpful?

Need more help?

Ask for human help about this article and provide any feedback.